
You may have noticed Electro Puppet arms operate a little different. In this tutorial we will go over why that is. Why it is a better and faster way for you to animate. Then we will go through how to work with the arms and finally how to create your own replays. So lets go!
When first importing one of our puppets, some users are surprised to find the arms fixed by the characters sides. Other puppets have arms that you can drag with the mouse or will copy your movement using full body motion.
So can you freely move ElectroPuppet arms? Yes, of course you can. If you just want to drag your arms, all you do is hit the 1 trigger and those arms will spring out and allow you to drag them around using your mouse.
Our puppets have had a bit more time and thought put into how they are constructed. Our aim is to provide puppets that are quick and easy to animate – and a joy to work with.
When we create our puppets, they are modelled in the A pose. This is with their arms outstretched on either side;
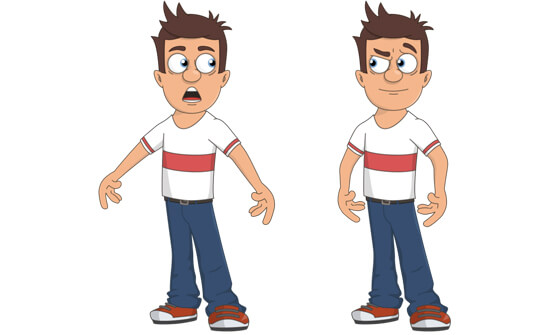
The reason we build our characters like this is because it gives the best neutral pose to set the rigging.
But we don’t want a puppet that stands there with their arms sticking out when we import them into Character Animator. We want their arms resting by their sides.
So we set the arms to have a default trigger that locks them by their sides. This is called a rest pose. The rest pose looks more natural – but more importantly, it works better with all the pre-made replays created for your puppet.
Our puppets come with a range of pre-made gestures (or replays). If you look at the trigger sheet we provide with each puppet, you will see what each trigger does. Many are the same across all our puppets. This is deliberate, as it makes our library of characters consistent and easy to use. We set these pre-made gestures for multiple views. So a right point will work whichever way your puppet is facing.
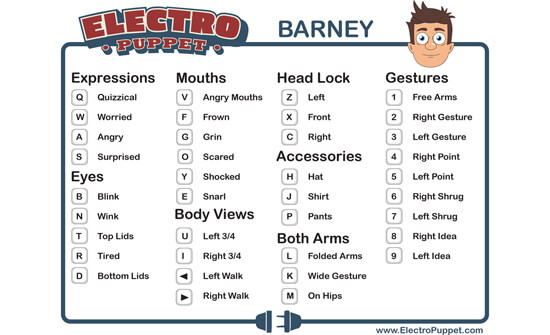
If you press and hold the 2 and 3 keys your puppet will gesture. You may notice when you do that, the puppets hands change. That is a replay. It is using a dragger with the arms and a swap-set on the hands to create the replay.
The replay will hold the pose as long as you hold down those keys.
In our experience, using replays like this offers a quicker, easier and more controlled performance than full body tracking. Using a triggered replay gives a really clean gesture – rather than trying to perform all these actions in front of the camera. But that isn’t where the real advantage comes with this approach!
Each of our arm replays are part of a swap-set. Left Replays and Right Replays. What is the advantage of that? When you record your puppet it will display on your timeline in a much cleaner and more organised way. Each arm replay is placed on its own timeline. But if you want to edit the performance, say switch a right arm shrug to a right arm idea, all you do is right click on the Right Shug and select the Right Idea replay. You can move it along the timeline or stretch it or shrink, which will change the duration of the replay. This way you can build a polished performance quickly without having to rerecord your takes.
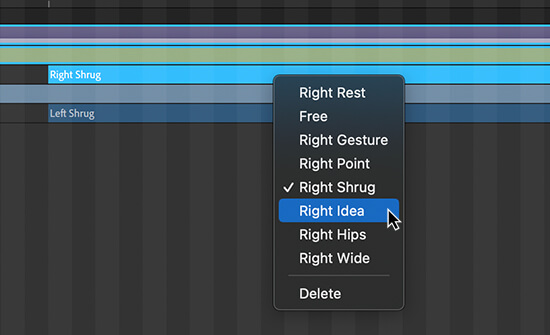
So what if you want to make your own replay?
Creating your own replay is a bit more advanced. So if you don’t need to do that you can finish reading here. But to those who want to give it a go, we can walk you through that process too.
Lets create a raised fist replay.
First thing to do is turn off the camera and mic. We only want to record our pose here. Not our voice or body position in the camera. Next step is to free your puppets arms, so we can pose them. So press the 1 key and the puppets arms should spring out to that A pose. Using the mouse, raise each arm.
Now we want to change the hand to a fist. To do that we will use the CONTROLS PANEL.
[The CONTROLS PANEL is something that we recommend moving down to the timeline area, so it displays full screen. If you are unfamiliar with doing that we have created a tutorial for that here]
Click on the Controls Panel tab and set the left and right hands to fists.
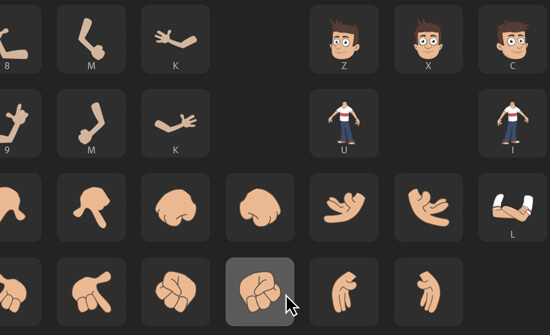

Now we want to set the puppets other 3/4 pose. You can do that using the trigger in the controls panel, or pressing either the U or I trigger. The fists should still be on, so all we need to do is raise the arms and then toggle between the 3/4 left and 3/4 right views to make sure both look how we want them.
Now we have posed our puppet, we want to record for about a second. We record for a second because that is how long the action of raising his fists will take.
If you look down to the bottom right of the timeline, you should see a zoom tool. Go ahead and zoom in so we can work in a more detailed way.

Allow it to record for about a second. Then stop.
Now your timeline should have a recording that looks like this;
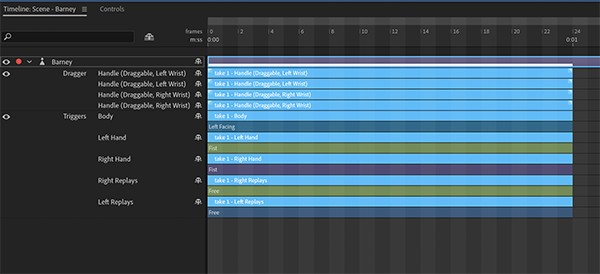
Now what we have on the timeline is some data we need to remove. And some data we need to edit. But first, while we have everything selected, make sure the whole sequence is a second or under. Because we zoomed in we can see the length of a second above, So with everything selected (so it is blue) drag the edge to a second or under.
Next we want to delete the parts that we don’t need. If you look at the data we recorded, we recorded 4 Dragger takes. Those are our arms for the two views. So we will keep all those. Under those we recorded a body take. That was because we were alternating between the two 3/4 body views to position our arms. So we can go ahead and delete that. Under that is the Left Hand Fist and Right Hand Fist. We want to keep those. And last we have the Right Replay Free arm and Left Replay Free Arm. We can go ahead and delete those. They are there because we set the arms to Free when we hit the 1 trigger. But we don’t need that anymore.
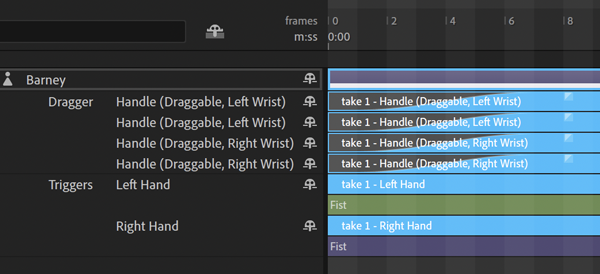
We have 4 draggers for the arms and two hands.
Next we want to set the blend handle to around 8 frames at either end. This creates an ease-in and ease-out for our arm motion. So with everything selected, click on the little box in corner of the the top ‘Dragger’. Move that along 8 frames. They should all be the same (as in the image below).
Do the same at the end.
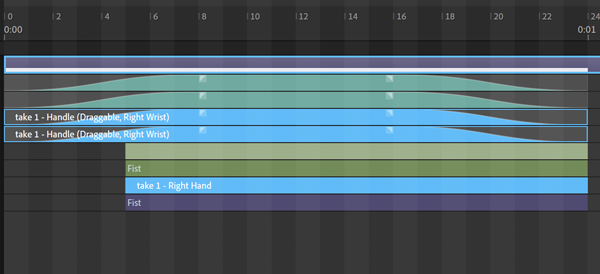
Next we want the fist to switch on near the end of the blend. So it becomes a fist when the arm is raised. So we can do that By selecting the two hands, and then moving the start point to six or so frames back. Be careful you are resizing the hands and not moving it along the timeline. We want it to look like this;
Now we want to turn each arm into a replay. So we have to be careful what we select here. We are going to select the right arm first. You can hold SHIFT to select multiple takes. We want to select the two right arm draggers as well as the Right Hand Fist.
Once you have all that you can right click and choose ‘Create Replay and Trigger’.
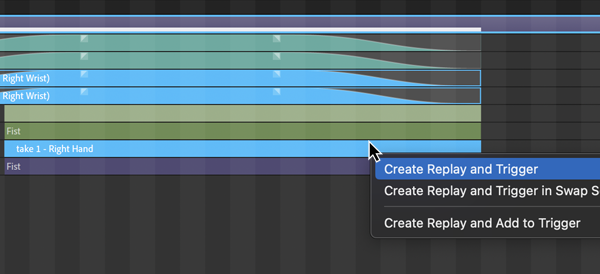
Cool, you have just made a replay!
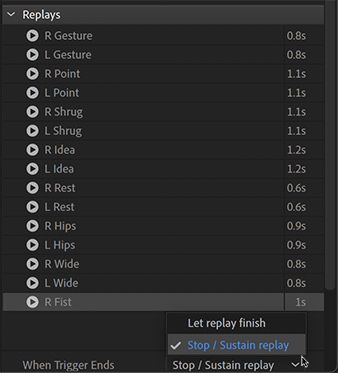
Over on the bottom right of screen you should see a window called Replays and your new replay is there. If you press the little arrow your puppet will perform the replay.
What we want to do now is to rename the replay (just to keep everything neat and tidy). So click on the new replay and hit return. Rename it ‘R Fist’.
If you hit the little play arrow you should notice that the raised fist your puppet is making doesn’t hold. It just plays and drops down again. So select that replay and at the bottom of the window set ‘When Trigger Ends to ‘Stop/Sustain replay’. Now your fist should stay up in the air.
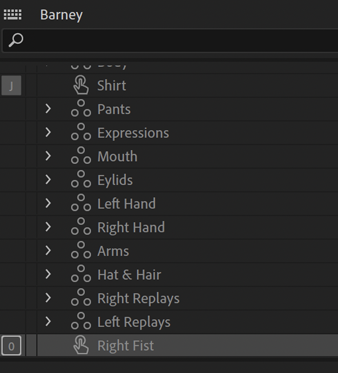
Now if you look over on the left of screen, you should see your new replay in the triggers window. We want to rename that one as well. So select that. Hit Return. And name that ‘Right Fist’.
We still haven’t assigned it a trigger. That might be tricky as we pack these puppets with loads of triggers. So have a look at your trigger sheet and see if you can find a trigger that hasn’t been assigned. On my puppet I can see the 0 (zero) key is free so I can use that.
Select the little square over on the right and enter 0 (or whatever key you choose).
If you are struggling to find an available letter or number, you can always remove the trigger of an existing trigger and use that. Or you can leave the trigger blank and just operate the replay from the Controls Panel.
To add the trigger to the controls panel, click on the CONTROLS tab. Have a good look at the controls as they are at the moment, as this next step will generate a bit of junk.
Right click the Refresh Layout button, down at the bottom left. You will get a bunch of null triggers that don’t do anything. That is the junk, so you can switch the panel to the ‘Layout’ mode, select and delete those.
Finally move your new trigger to where you prefer and switch the CONTROLS back to ‘Perform mode’.
You may want to go back and follow the steps to make your Left Fist replay as well.
Now – these changes are only available to the puppet you’ve modified in this Character Animator Project. If you want these changes to be applied to the puppet you import – you are going to need to export the puppet you have modified.
To do that choose;
File> Export> Export Puppet
And be sure not to save over your original .puppet file. Give this one a new name that you can identify, like ‘Barney_Fists.puppet’ and save it somewhere you will know to find it.
And that’s it!
In this tutorial you’ve learnt why Electro Puppet arms are the way they are. The benefits of this approach. How to work efficiently with recording and editing your replays and how to create you own replays!
Now you’re ARMED AND DANGEROUS!
ElectroPuppet acknowledges the traditional custodians of the land, the Gumbaynggirr people.
We pay our respects to their elders, past, present and emerging.