Before starting, you may want to plan how you organise your assets and files. Otherwise, you can end up muddled where you left an audio track or puppet file. This is especially important if you are creating multiple episodes.
So, it’s a great idea to create a FILE STRUCTURE for your project.
We created a tutorial on that [here].
First thing we need to do is create a new project in Adobe Character Animator.
Next, we import the puppet we wish to use.
CREATING A NEW SCENE
Now we will create a SCENE. You can do that by selecting your puppet and clicking the little clapperboard icon.
If you are unfamiliar with the above three steps you can learn that [here].
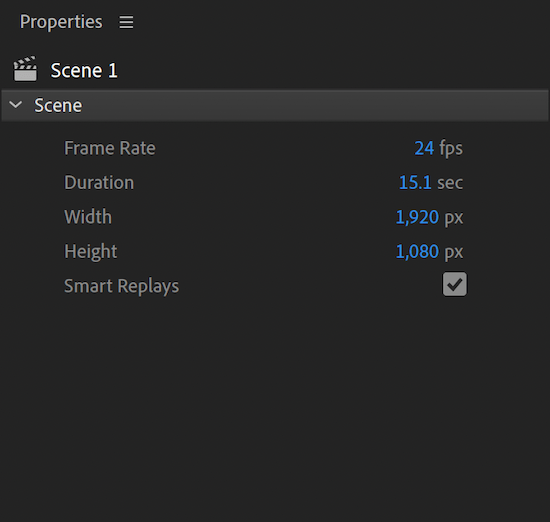
Make sure your scene has the correct dimensions and frame rate for your final output. I’m going to set mine to 1920 X 1080 and use a frame rate of 24 frames per second. You can check and adjust the settings of your scene by selecting the SCENE icon and looking at the PROPERTIES panel, on the right of screen.
Now we should have an empty scene with our character standing in the centre. What we will be doing next is blocking the scene. We will do that SPATIALLY and TEMPORALLY.
Spatial blocking means setting the scale and placement of assets. You may want to import any additional puppets or a background – as these may affect where everything is placed in relation to one another.
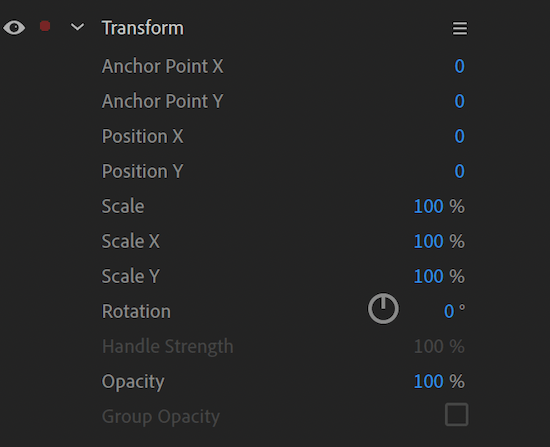
To set the scale and position we will be using the transform controls, found on screen right. Select the puppet (or item we wish to modify) in the timeline window. Then using the transform values to change the scale and position.
So, go ahead and bring in any additional elements that are necessary, then scale and position each.
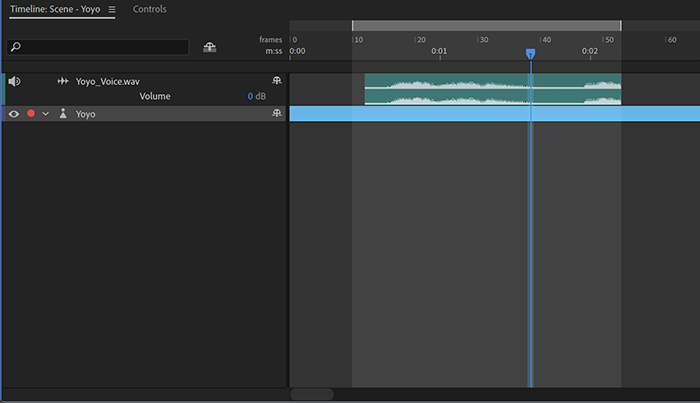
Temporal blocking is laying out time-based elements. This is usually your voice-track. Your voice-track will often be the best guide of how long the clip will go and give you all the cues when your puppet should perform certain actions.
If you haven’t recorded your audio – we go over recording and treating audio in [this tutorial].
Now you have imported your audio – we want to make sure we place it in the right place. We’re NOT computing the lip sync just yet. We are just blocking out where the audio will play.
We DON’T want our audio start on frame 0, as we need to allow the puppet to settle. We go over allowing your puppet to settle in [this tutorial]. So, shuffle your audio along by 15 (or more) frames.
You may want to have your puppet walk in or out of frame. That is going to affect the timing – so best set that now. You can follow a tutorial on setting your puppet to walk [here].
Now I am happy with the placement of the audio track. Everything seems to be where I want it to happen, so I can go ahead and compute the scene audio.
You may want to refine your lip-synch results – so there is a tutorial on that process [here].
We are now ready to start animating. We are going to do this in passes, focusing on a certain area during each pass.
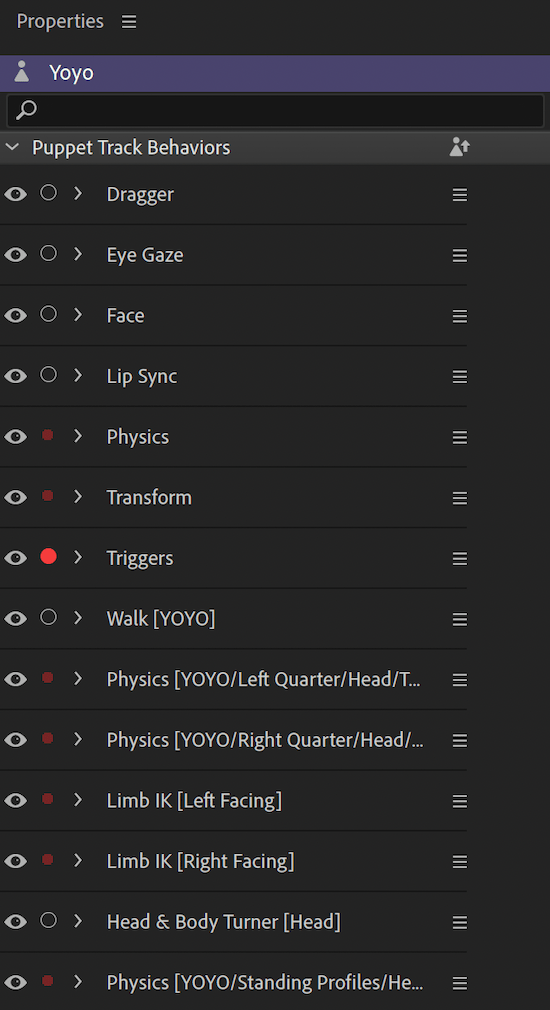
Before doing any passes we want to disarm most of the behaviours. I’m going to be using triggers for the first series of takes, so I am going to disarm Dragger, Eye Gaze, Face, Lip Sync, Walk and Head & Body Turner. The others don’t really matter.
I’ll do this by switching OFF the little red dot next to each;
First up, I want to set which way the body faces. If it is already facing the correct way, I can ignore this step. I want the body to face the opposite way, so I am going to hit the ‘I’ trigger and press RECORD.
I don’t need to wait for the length of the clip – just a few seconds and I stop the recording. Then I just grab the edge of the take and stretch it out to the length of the clip.
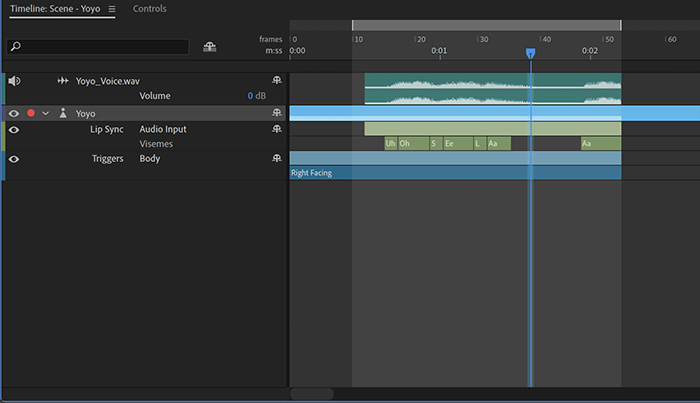
Now I want to set the head rotation or angle. Head angles can be controlled via the camera, using the head turner behaviour – however I am going to use the triggers for a little more control.
Like the body, if I want to a single angle, I can record for a few seconds and then stretch the take out. If I want to use various angles I can just let the recording run and switch between the three head options.
After I have recorded my head animation, I move onto the facial expressions.
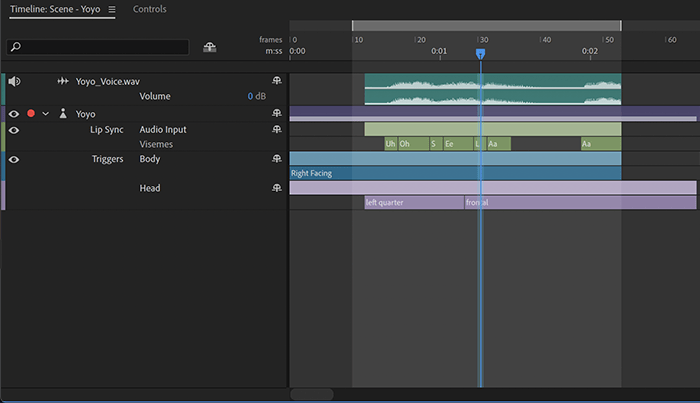
Next, I am going to focus on expressions. That is using the triggers Q, W, A and S (Quizzical, Worried, Angry and Surprised). It doesn’t matter if I hit the correct trigger every time – because I can easily edit them after.
I just want to trigger something each time I want an expression change.
So I hit RECORD and hold down the W each time the voice implies an expression change.
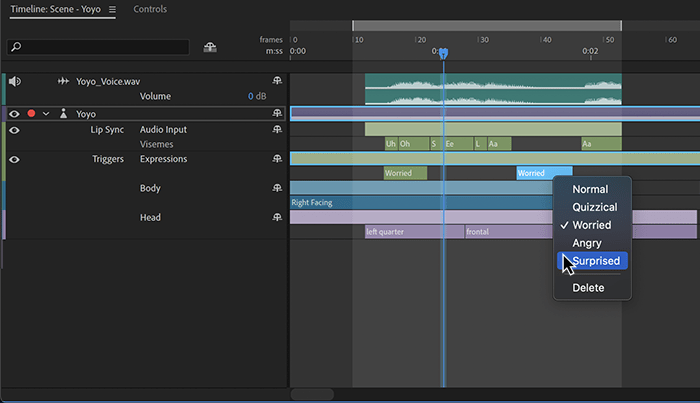
At the end of the recording process, start to rewatch the clip and then start editing the expressions.
Right click on each trigger and switch the trigger to one of the other states. It doesn’t have to reflect the expression. For example, sometimes when the character asks a question, the Angry or Worried state might look better than Quizzical. Following the use of a state by a different state looks more expressive than re-using the same state.
So experiment. You can also drag out or decrease the length of each take and shuffle it along. By playing with these you can quickly build an expressive character.
Once we are happy with that, we can move onto mouths.
We don’t need to change any of our armed/disarmed settings because we are still using triggers.
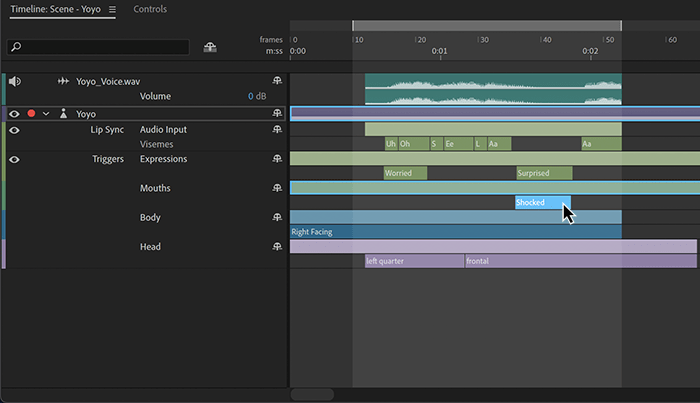
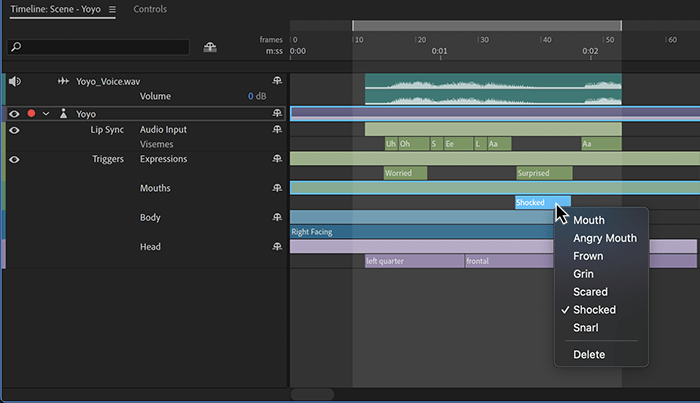
We don’t want to use mouths when the character is speaking – however we can use the available mouths when the puppet is silent. This is always good to make the puppet look like it is engaged with any other character. Mouths offer a number of options. E,Y, F, G, O (Snarl, Shocked, Frown, Grin and Scared).
Same as previously, you can do a quick recording and just hit one of those triggers – then adjust and change each instance as you rewatch the clip.
You also have an angry mouth set – so if your puppet needs to speak with an angry expression, you can set that too.
So I am going to press RECORD and then trigger the Shocked (Y) trigger each time I want a mouth to happen. After the recording I will edit each.
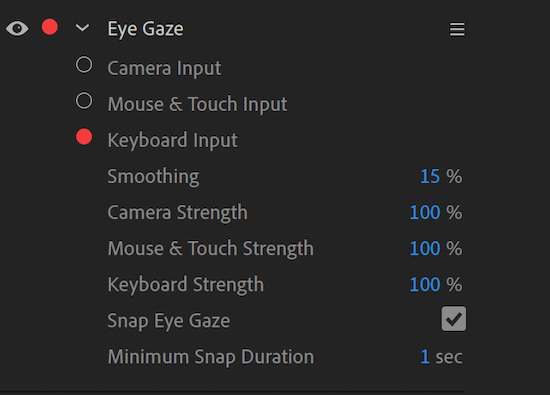
Next we want to do Eye Gaze. The Eye Gaze (or pupils) can be controlled via the webcam – however we always recommend setting eye gaze via the keyboard. The webcam is a clumsy way to set your eye-gaze.
To do this we are going to arm Eye Gaze and inside that behaviour we are going to disarm the Camera Input and arm Keyboard Input.
[A quick side-note: we should have already disarmed the walk behaviour. However if you haven’t, when you use the arrow keys the puppet may start walking in that direction. So be aware of that!]
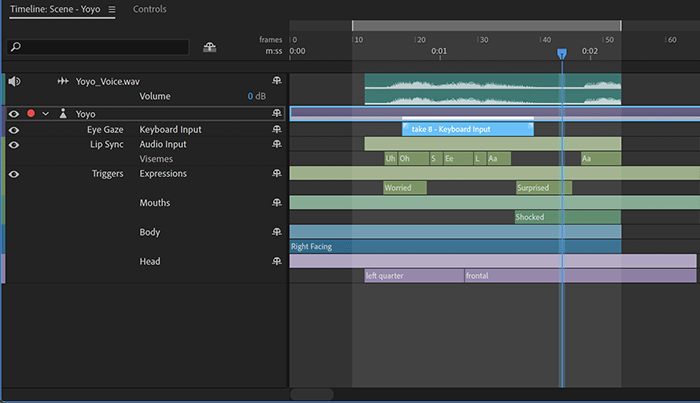
Often when I am animating the eyes I will jump to the part of the timeline where I want the eyes to move and I will do a take there, rather than doing it for the whole clip. That then lets me know this little take is the eyes darting to the left and then back. It makes it easier to have more control rather than one long clip where I don’t really know when the pupils are active.
Now we are going to record a take and use the keyboard to control the eyes.
Now we are going to record one of the trickier takes. The Face – or the head and shoulders, because we are using triggers to control most of the face. In this take we are just recording the angle of the head and upper body.
This take is trickier, because we want to get it all in one take. You can try to blend between various takes if you want – however we always find the transition between these a bit jumpy. So one take is preferable.
Disarm everything except the FACE behaviour. Hit the little camera icon to turn on your webcam. When we record this pass, we will be aiming to create a very subtle movement and hold the pose for a time.
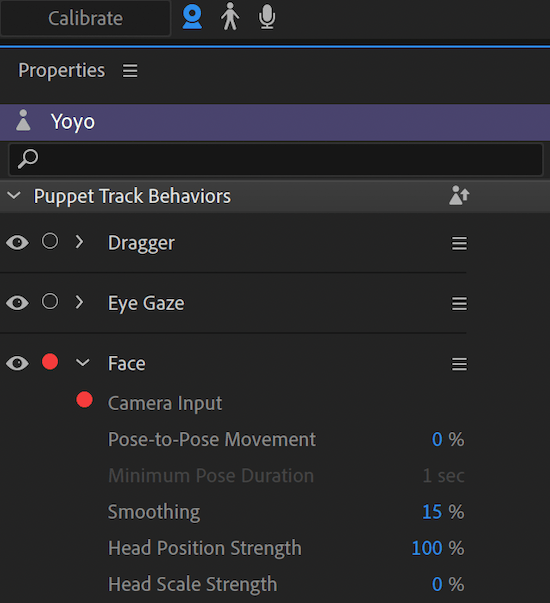
What is important when you do this pass, is you hit that CALIBRATE button all the time.
You’ll find the calibrate button just under the camera viewport. This will refresh the relationship between you and the puppet. Puppets often get all squished into funny poses as time goes on. So it is important to hit calibrate to re-establish your relationship with the puppet. Especially before every recording.
So before recording, do a little practice to get used to the subtle movement. Hit CALIBRATE and slightly change the angle of your head and body and hold. Try not to blink, open your mouth or grin (as these may trigger your puppet to do the same). We only want to record your slight head and upper body lean.
Once you have gotten a feel for the type of movement, you can go ahead and hit CALIBRATE and then hit RECORD.
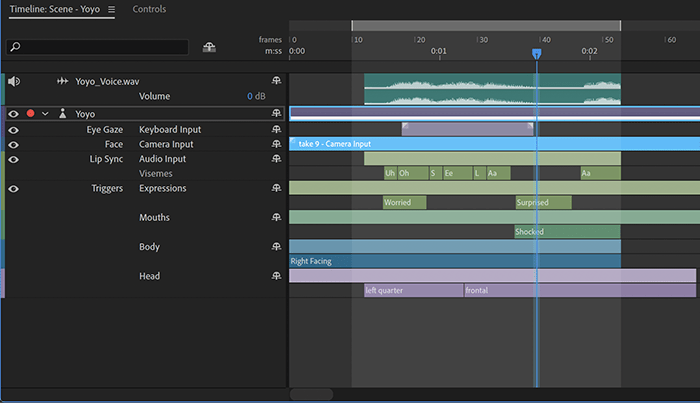
Now, while the dialogue plays, perform those subtle movements. Try to move and hold the pose and imagine what the arms will be doing as you do this – as that will be what we do next.
If you don’t like the take you do, you can undo or delete it and go again. So don’t panic if you don’t get it right first time you try.
When you are done. Turn off the webcam and disarm Face and rearm TRIGGERS.
Now we are going to do the arms.
Toon Loon’s arms have been carefully built to make animating as quick and fun as possible. If you would like to read a more in-depth tutorial on what is going on with them, you can read that [here].
As before, we are using triggers to activate various replays.
Arms are driven by the numerical keys (1, 2, 3, 4, 5, 6, 7, 8, 9, 0) and the M, K and L keys. The even keys will drive the right arm, the odd keys the left arm. M will place both arms on hips, K will gesture with both arms L will fold the arms.
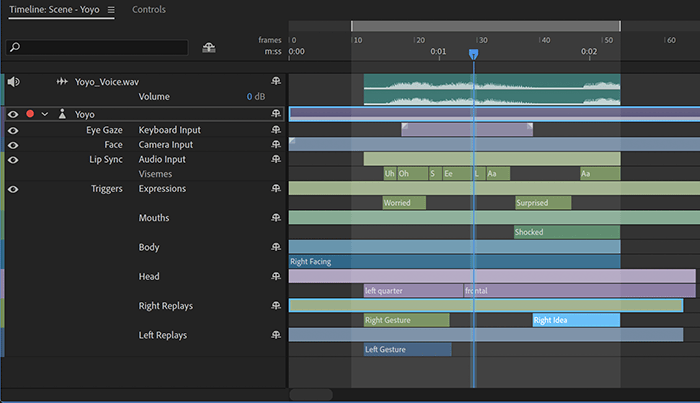
It is also worth mentioning that you can launch all the gestures from the hands on hips for a different pose than arms by side. To do this try hitting M to place the hands on hips – then try hitting some of the gestures. To return the arms to their sides press the M trigger again.
It is a good idea to look over your trigger sheet to familiarize yourself with all the options these puppets provide. You can also have a look at the Controls window and look over those.
Your triggered arms work the same as the other triggered actions. So you can just use a left and right gesture (2 & 3) to trigger and hold the one pose – and then when you are finished your take you can go through and right click to switch to different gestures.
So lets do that. Press RECORD for another take and press and hold the 2 and 3 keys individually or separately each time you think your puppet may gesture.
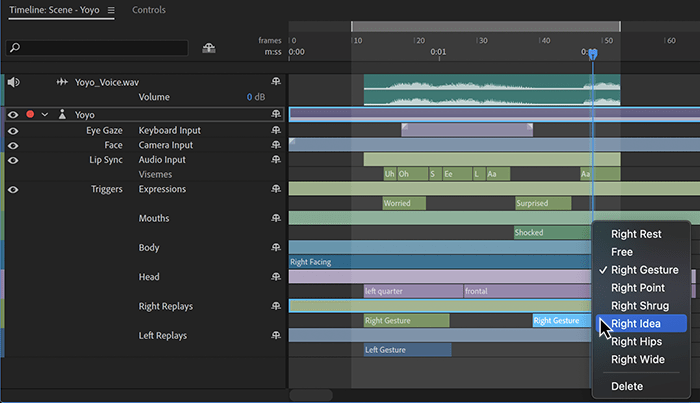
After recording your take, we will edit what you just recorded. So rewatch the first part until you find a replay you would like to change. Right click to swap to a different gesture. You can extend or shrink the length of the replay. You can copy and paste them or delete anything. Have a right and left replay happen at the same time to achieve things like a shrug.
Now I will animate the eyelids.
If I want to have the eyelids bored or tired for the duration of the clip I would do that by recording a short grab, and then stretch that take for the length of the clip.
To do blinks I hit RECORD and then every now and then, I hit and hold the B trigger.
Then, after the take I can edit the blinks by moving them around, changing the length and deleting or copy and pasting additional blinks.
Blinks work really well when you add them over eye movement. So the character blinks, and the pupil is now looking left, he blinks again and the pupil is now looking forward again.
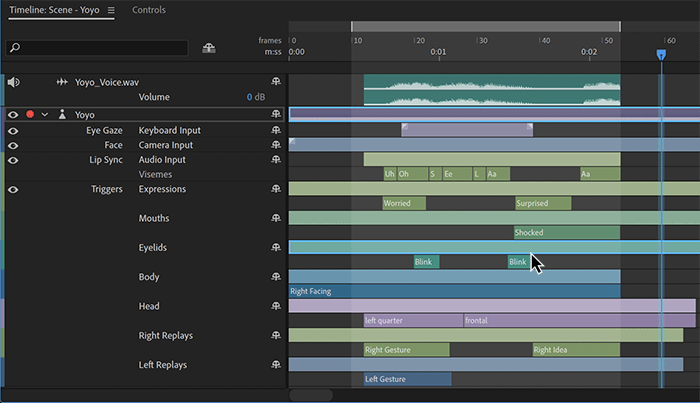
Last thing I’ll do is a quick final polish. You may also want to add any accessories that are unique to your puppet.
Now I can see the whole performance working together and that will inform some decisions like shortening a gesture or adding a head angle. It’s good to step away from your work and come back with fresh eyes too.
As you can see above, all of my timeline is neatly organised. Each take is a single row and editing and shuffling elements around is really clear and easy.
In this tutorial we went over the process of animating a Toon Loon puppet in passes.
We first set up the scene and blocked out the characters. Then we disarmed everything except what we were concentrating on. This allowed us to quickly build a polished and controlled performance using all the features of the Toon Loons puppets.
You don’t need to follow the exact order or go into the detail I do. But the more attention and detail you add, the stronger your animated performance will be.
ElectroPuppet acknowledges the traditional custodians of the land, the Gumbaynggirr people.
We pay our respects to their elders, past, present and emerging.